


In this article, I want to discuss the various elements of an HTML form. At the end of this article, you will be able to:
- make a contact form for your webpage
- link it up to your Email account to be notified of submissions on your form.
As defined in MDN Web Docs,
the
<form>HTML element represents a document section containing interactive controls for submitting information.
The form element helps get data and information from a site visitor, for different reasons, it could be for contact purposes, subscription to services, registration e.t.c
Below is a basic HTML form:
<form>
    <label for="firstname">First Name</label>
    <input type="text"  id="firstname"> <br><br>
    <label for="lastname">Last Name</label>
    <input type="text" id="lastname"> <br><br>
    <textarea placeholder="leave a message" id="message" rows="4"
    cols="30"></textarea> <br>
    <input type="submit" value="Submit">
</form>
Output:
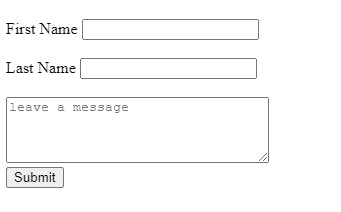
The code snippet above showcases essential elements that make up an HTML form; we have label, input and textarea; other examples are select and fieldset. Let's discuss each of these tags and some of their attributes.
Label Tag
The <label> tag describes other elements/tags in an HTML form. In the case of an input field, it describes the type of information required in the input box to which it is attached. It is used interchangeably with the placeholder attribute of an input element/tag. You can learn more about this tag here. It has a for attribute with the same value as its corresponding input's id attribute.
Input Tag
The <input> tag provides a field where the user can enter information. It is the primary form element since it is where data is passed. Depending on the type attribute, it can be represented differently. As seen in the example above, two different input fields are being used, one of type text and the other of type submit. Let's discuss some of the commonly used types below:
text- a basic text box that accepts a single line of textemail- a type of input that requires the use of a valid email addressnumber- a type of input that requires the use of a numberpassword- a type of input that replaces characters typed with symbolsradio- a type of input which -unlike a checkbox that allows you to select multiple options- allows you to choose a single optionfile- a type of input that allows you to upload a filesubmit- is a type of input that acts as a button; it tells the browser to take action on the form.Although, a better approach is to use a button element to handle the submit action. One reason is that it allows you to nest other elements, read more about other reasons here
Some other attributes of the input tag are id, name, placeholder, required. You can read more about these attributes here
Textarea
The <textarea> tag is similar to a text input field. It is a type of input that allows multiple rows of text to be displayed and entered.
Select tag
The <select> tag is a drop-down list that displays a list of items a user can select from.
Fieldsets
The <fieldset> tag allows us to segment different parts of an HTML form, and it allows us to make a group of related elements. We can use fieldsets to separate different parts of a form that collects similar information, e.g. personal information(name, age, gender), address information(street, town, country, zip-code), career information.
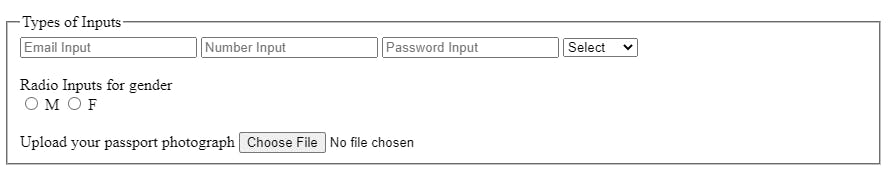
Now, let's use a fieldset to showcase other types of input discussed here that isn't present in the first example:
  <fieldset>
      <legend>Types of Inputs</legend>
      <input type="email" placeholder="Email Input">
      <input type="number" placeholder="Number Input">
      <input type="password" placeholder="Password Input">

      <select name="" id="" required>
        <option value="" disabled selected>Select</option>
        <option value="option1">Option 1</option>
        <option value="option2">Option 2</option>
        <option value="option3">Option 3</option>
      </select><br></br>

      <label>Radio Inputs for gender</label> <br>
      <input type="radio" id="male" name="gender" required>
      <label for="male">M</label>
      <input type="radio" id="female" name="gender" required>
      <label for="female">F</label><br><be>

      <label for="passport-photo">Upload your passport
      photograph</label>
      <input type="file" id="passport-photo" accept=".jpeg .png">
  </fieldset>
Here is what the output looks like:
With the knowledge of these HTML form elements and CSS styling, you can design a contact form for your webpage.
Linking your HTML form to your email
After you have your styled HTML form set up, you're ready to link it to your Email account. Formspree provides an easy way to achieve this. Sign up on their website and follow the steps to create a new form. When all that is complete, you will end up with a page like this:

As seen in the image above, you are provided with:
- An endpoint you would add to the action attribute of your HTML form, this endpoint is where the form submissions are collected and sent to your mail
you can also view the first few submissions in the submissions tab
- A link to HTML form templates you could use on your web page
- Examples to allow you to integrate your form with your use case. We are going to focus on the first two options(
HTML,AJAX)
Going with the first option means you only need to update your form's action and method attributes with the values provided. Still, a downside to this approach is that users get redirected to another web page provided by formspree that notifies them that their information has been submitted. This takes them off your web page. This could lead to a bad user experience as they might want to do other things on your web page. This is where the second approach saves the day.
Although the second approach requires a basic knowledge of JavaScript, you could tweak the provided example to work for you with just a little guidance I would give below.
- add an empty
<p>tag that has anidattribute specified at the end of your form as shown in the example<p id="my-form-status"></p>. The text that would notify the user of the form submission would appear inside of theptag - copy the script provided and place it at the end of your body tag. A better approach would be to copy the contents of the script tag into an external js file then link at the end of your body tag. It would look something like this:
<script src="index.js"></script>
Next Steps:
- Make the notification text that appears at the bottom of the form disappear after some time
- Check out other functionality that formspree provides(an example is the
pluginspart of the form) and how you can leverage them.
I hope you find this article helpful.